Bicycles
As touring cyclists our choice of bicycles and cycling equipment are obviously central to the success or otherwise of our adventure. Equipment has to be cost effective, reliable, long lasting, light and functional. We don't try to win fashion contests nor get hung up about the best designer gadgets. We know what we need and don't begrudge spending money on the right gear. Having put over 40000km behind us we are building a depth of experience in specific Items of equipment.
To find the right products we search the Net and visit high street stores. Our main on line suppliers are:
Chain Reaction CyclesWiggle Online Cycle Shop
Evans Cycles
SJS Cycles
1 - Bicycles
When we were planning our RTW ride we looked at a number of different touring bicycles. We looked at some of the traditional names such as Dawes and at some of the other more contemporary designs such as the Koga Miyata, which we have seen a number of riders using and which are very nice fully featured bicycles.
We had also seen the Thorn Cycles Expedition bicycles using the Rohloff 14 gears hub. These are all hand built frames and were way beyond our price range. When I rang Thorn to enquire about other models Andy Blance their chief designer told me that they were about to come out with a new frame design, based on the Expedition using a frame made in Taiwan and only available in two colours and three standard frame sizes, but at a substantially lower price. This is the Thorn Raven, Nomad
A key factor in our selection was that we wanted the Rohloff , 14 gear hub, because of its promise of low maintenance and extreme reliability, (reputedly no one has ever managed to wear one out yet). After years of dealing with problems with gears, bent derailleur hangers, and annual chain set replacement, etc, they sounded ideal for long distance touring, requiring only an annual oil change to keep them "singing along". We had read various reports about people having these hubs retrospectively fitted to their bicycles and having problems with spokes breaking. We wanted to make sure that we didn't suffer these problems so one of our criteria was to select bicycles that had been specifically designed around the Rohloff Hub. The Thorn bicycles met this criterion.
The frames are standard, but the final build is to order. You can select whatever components you want, although the sales people at St. John Street Cycles (Thorn's sales outlet) were very helpful in making recommendations. Karen and I opted for identical builds except for frame size and saddle selection.
2 Bicycles - Gears
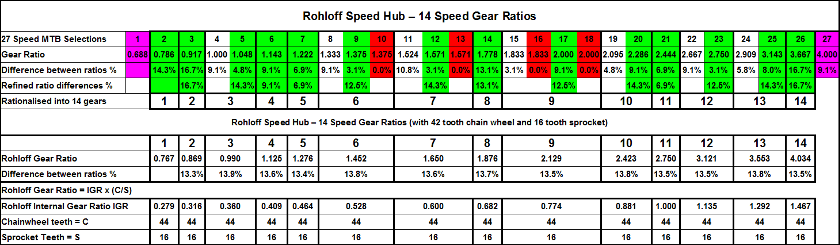
As stated, we chose Rohloff speed hub gears. The Rohloff has 14 equally spaced gears, but the actual range covered can be selected to order. We were a bit concerned as to whether 14 gears would be sufficient, as we had previously had 27 gears on our mountain bicycles. Or had we? A typical mountain bicycle has three front chain wheels and 9 rear sprockets = 27 gears yes? Well actually no. The table below shows the relevant gear ratios (Chain wheel teeth / Sprocket teeth) for all 27 gear combinations.
In order to prevent excessive chain set wear, it is recommended that any
mountain bicycle user should not mesh the smallest front cog with the
largest rear cog and vice versa, (although many do). This means that
you can effectively discount the lowest and top gears, (those highlighted in violet). 27 down to 23.
Four of the gear combinations are exactly the same, (those highlighted in red). 23 down to 21.
On further examination you will see that 7 of the remaining combination
shows differences in gear ratio from their nearest value of less than
6%. These are very small step differences that the user hardly notices
in practice, often shifting two or three at a time. So, if we ignore
these and take the next nearest values the new "refined" ratios we end
up with 14 "effective" gears.
This still leaves the gear ratio differences uneven, ranging from 6.9%
60 16.7%. Cleverly, the Rohloff system spaces the ratios very nearly
equal at 13.6%. It makes for a very smooth transitional gear sequence as
opposed to the clattering of the conventional derailleur.
We selected a 38 tooth chain wheel as we are more bothered about getting
up the hills than maintaining good top speeds. This selection has
proven to be very suitable for our style of riding, i.e. leisurely. Only
occasionally, when going along the flat with a following wind do we
feel that we could do
with another one or two top gears on our bicycles. The lower gears are
ideal for taking a full load up a 15% incline. Much beyond that and you
are into pushing your bicycles up hill, (at least we are).
It is possible to fit two front rings and use a conventional gears
selector, but frankly we feel this introduces the very thing that we
have eliminated by getting rid of the derailleur and doesn't really
give that much advantage to us. It would be great if Rohloff could
design a two or three gear drive to fit in the bottom bracket casing to
give greater range.
When we were in West Yorkshire we met a guy from the Netherlands who was riding a new bicycle from the Netherlands company, Santos. We were salivating at this bicycle. It is equipped with the Rohloff gears, but Santos have also developed the use of Carbon Fibre belt drive system, which we believe Rohloff are fully endorsing. The only issue is that it cannot be split apart for fitting, so Santos developed a special break point in the rear frame. Unfortunately having shelled out thousands for our bicycles we are not about to change to the new drive at all soon.
One slight complaint. We talked about the low maintenance. In
fact they are, but you do have to change the oil once every 1000km,
which comes around surprisingly quickly when you are touring. You can
only buy the oil from Rohloff
as a kit and thus probably pay a lot more for it than you need to. Of
course you have to use their oil as otherwise if there is a problem you
have no recourse to complain.
There is one other issue that relates to the installation of Rohloff
gears into the wheels, which we will touch on in the section on wheels.
Update
Our Thorn Nomads are now four years old and in the last two years we have completed well over 20,000km. They have performed very well and we are generally very satisfied. We have a had a few issues that are worth mentioning. The only failure that we had was in the original Mavic wheels, (see detail discussion below). We have fitted new chains and changed around the front and rear cogs. This summer I noticed one of the Gear Hub oil seals was leaking so I have replaced the seals in both hubs just to be sure. We have also replaced our bottom brackets.
One point of failure has been the bottle mount boss at the bottom of the sloping tube of the frame. The frame has SS couplings which means there is no possibility for water to drain out of the bottom of the tube. Over time water ingresses and pools at the bottom of the tube. This causes the boss to rust and in both bikes the boss has completely rusted and fallen out of the frame. We had to have them re-welded and resprayed.
We have also resprayed our frames twice.
3 Bicycles - Wheels
To be honest, we didn't know too much about what type of wheels to have
fitted to our bicycles and relied to a large extent on the
recommendation of Thorn. They suggested two different wheels. The first
had ceramic coated rims, which makes for a very hard wearing rim that
does not cover your hands with black aluminium dust every time you
touch them. However, they were expensive and so we went with their
other suggestion, the Mavic Extreme 721. These wheels are apparently
designed to take the hammer of mountain biking and the weight of
bicycle touring. Thorn recommended them at that time, so we had no
reason to doubt that they would do the job.
The Rohloff
hub requires 32 spokes so the rear rims were selected accordingly. The
front wheels were also chosen to use 32 hole rims, for the purposes of
interchangeability, with Shimano Deore xt hubs. This interchangeability
would later come in very useful.
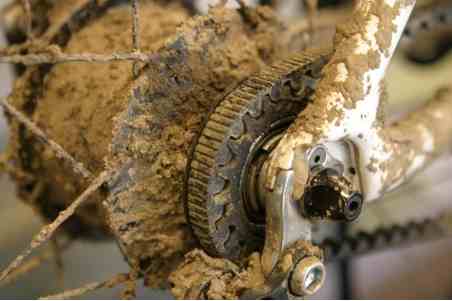
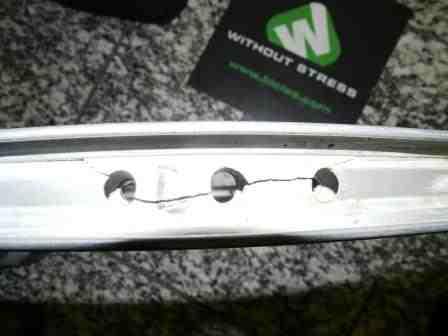
The wheels performed without problem. We changed the blocks in our our brakes once, but otherwise everything was fine, until we had covered some 3500km or so. As we were riding through Portugal, Steve's rear brakes started to develop a slight "pulsing" feeling, as if the wheel was buckled or had a high spot on the rim. It was only slight to start with and we couldn't see what the problem was. Later, as we were cycling around Lisbon over a lot of cobbled streets, it got progressively worse until, on closer inspection it was obvious what the problem was terminal. The side wall of the rim had a crack about 40mm long around its circumference. We spent a day in Lisbon having the rim from the front wheel fitted to the rear and bought a new front wheel. Once the old rim had been taken off we could see the full extent of the damage. The inside of the rim had also cracked badly across the valve hole. We could also see around some of the spoke holes other hairline cracks (see pictures).
Following the replacement of Steve's back wheel, we did perhaps another
three to four thousand kilometers, before we started to notice similar
problems occurring on Karen's back wheel and even our front wheels were
looking very concave and showing potential cracks. We contacted Robin
Thorn again and he agreed that on our return to the UK, he would rebuild
our wheels at no cost, provided that we paid for the new rims.
Robin Thorn thought that it was down to wear, but in our view a rim
should last longer than a few thousand kilometers and I still question
the original recommendation.
Our new Rigida Andra 30, tungsten carbide coated 26inch/ 559 ATB alloy
rims coupled with the Swiss Stop blue brake blocks have been fantastic.
No rim wear and the pads have outlasted anything that we have used
before. They were definitely worth the extra money.
4 Bicycles - Tyres and Tubes
We have had more mixed results with our tyres and inner tubes.
Our initial selection was the Schwalbe Marathon XR 2.1 inch and heavy
duty Schwalbe inner tubes with Schrader metal valves. The Marathon is
renowned as the touring tyre of choice by many of the World's bicycle
tourists.
During a few short rides around the Scottish Hebrides, we switched to
the Continental Travel Contact 1.75 inch. These are great tyres
supplied with a free inner tube and one year guarantee. We had no
problem with them at all. Rolling resistance is low and they gave a
stable and comfortable ride.
However for our big adventure we moved back to the Marathon tyres to
enable us to go off-road. We clocked up 8600km on these tyres before we
started to suffer repeated punctures and decided that perhaps they had
reached the end of their fault free lives.
By this time we were in New Zealand. We wanted to fit the same tyres,
but had trouble finding them either locally or on line, so opted for
their successor the Marathon Extreme. Marathon extolled the virtues of
this new tyre with its double density puncture resistant casing. We
ordered them from Wiggle. They were delivered free within five days and
at a price almost 30% lower than we could buy them locally in New
Zealand. Result! However, Wiggles shining performance was shortly to be
overshadowed by the performance of our new tyres.
After only 3970km, all be it including perhaps 150km of off-road,
Steve's rear tyre failed. It had suffered a small cut by glass, about
4mm long. The webbing on the inside of the tyre separated and the tyre
started to bulge badly. We switched the front tyre to the back and
fitted a spare Marathon XR1.75 to the front.
After another 1758km Karen's tyre failed in exactly the same way. So a
total of only 5728 for Karen's tyre. Again we switched the front to the
back and fitted a cheap Thailand made tyre to the front.
Compared to the XRs we were very disappointed with the Extremes. We
complained to Wiggle who promptly sent two new tyres to our UK address
(for us to fit on our return) without question. Again Wiggle
demonstrated their great performance.
In Thailand Karen's switched rear tyre started to bulge in the same way.
This one had done a total of 7317km. We fitted a cheap Kenda tyre to
replace it. Steve's switched rear tyre lasted the tour out and clocked
up 8000km.
For our next year of touring we have switched to Panaracer, Pasela Tour
Guard. As we realise that most of our riding will be on road we have
down sized to 1.75 tyres. As I write this we are only about 1000km into
our tour. Most of this has been on road, but we have also ridden over
100km of very rough off-road. Time will tell. We will keep you
posted.
One final thing on tubes and punctures. When we had our new Rigida Rims
fitted, the spoke holes were drilled out to enable fitting of the
Rohloff hubs, which require a greater angle on the spokes. These holes
were improperly finished, resulting in sharp edges. I applied the old
style of cloth rim tape. The combination of these rough edges and
inappropriate rim tape, lead to a lot of punctures. To overcome this
used a round file to de-bur all the spoke holes and fitted a high
pressure, Schwalbe rim tape. This seems to have overcome this problem.
5 Bicycles - Brakes
Previously
we had found the Hope disc brakes on our mountain bicycles to be really good
and we were sorry to give them up.
We chose rim brakes for our touring bicycles. The reasons given for
choosing standard cable, rim brakes are firstly, if you need to replace
either of your wheels, it is easy to buy a standard wheel in most
places of the World, but not so easy to find one for disc brakes.
Second, it is more difficult to repair or replace a damaged disc or
hydraulic cable. Most bicycle shops keep rim brakes, cables and rim brake
shoes.
While we cannot say they are bad, (far from it, they have performed
without problem), we would still prefer our disc brakes. As yet we
don't really have enough touring experience to say that V brakes are a
better choice than disc brakes and we are still undecided as to whether
hydraulic disc brakes are truly at any more at risk than the
mechanically simpler rim brakes.
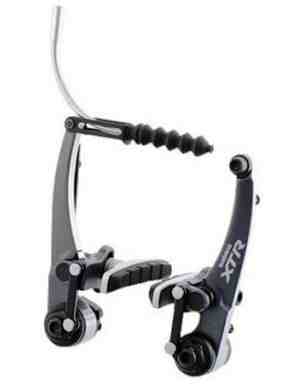
Our brakes are Shimano XTR M970 V Brakes. These are particularly good as the brake blocks can be replaced without replacing the whole brake shoe. While this doesn't make the job significantly easier, it does mean that the spares you need to carry are thinner and lighter. Replacement blocks generally enable fitting to take account of the right amount of toe in thus avoiding the need to mess about with shimming. The brake mechansim also ensures that the brake shoe is always acting parallel to the wheel rim.
Update
Since changing to our Rigida rims we have upgraded to the very expensive
Swisstop blue brake pads. They have performed really well. Nice
smooth braking and wear as been at a very low rate,making them in my
opinion worth the money.
Really we cannot fault the performance of the Shimano Brakes calipers. They have performed flawlessly.
6 Bicycles - Handlebars
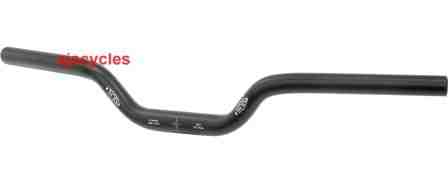
We chose comfort bars. These are not straight, but are raised at each end, what some might call a sit up and beg position. This means that you are not leaning far forward, which can overstress your back on long tours. We have found this riding position to be very comfortable throughout a long day in the saddle.
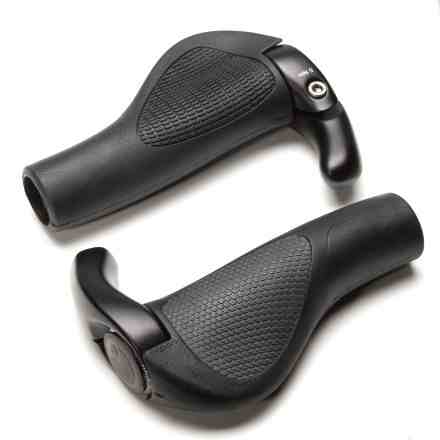
We also fitted Ergon anatomic grips and bar ends to help relieve pressure on the ulna nerve. This set up gives you a lot of options for different hand positions, but was not as effective as we had hoped and we still suffer from numbness on a long ride.
Update
Still happy with these although Karen broke on bar end in an accident and the rubbers are starting to get worn now. I guess they may need to be replaced at some point in the future.
7 Bicycles - Saddles
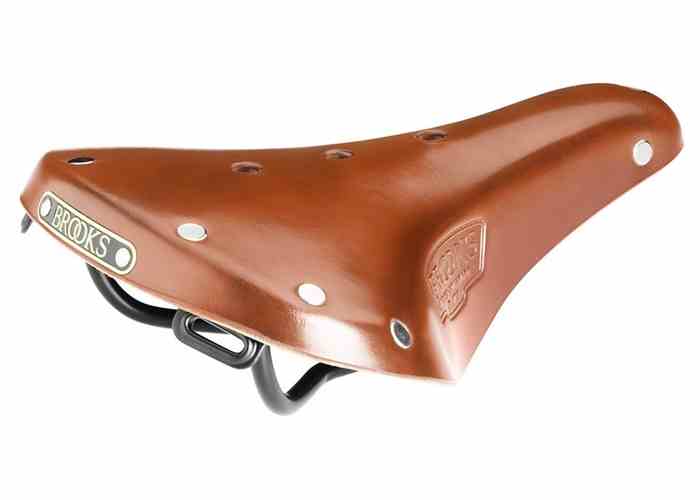
Steve chose a Brookes leather saddle. Previously he had use gel saddles and not
been entirely comfortable with them. The nice thing about the leather
saddle is that your shorts slide easily on the leather, where as with
some gels saddles they can drag bit.
Karen chose a women's specific gel saddle and has been happy with it.
Everyone says that saddles are entirely personal and it is worth trying
out a number of different ones to get the one that is right for you.
Who actually ever does? Nobody we know. Frankly you select one that you
think feels OK and then you get used to it or you get another. The main
thing is if it causes you real discomfort over time, then ditch it and
get another.
Update
During our last tour Karen was suffering chaffing. The width of the saddle was fine, but it was rubbing that was the problem. She has just changed to a Brooks Flyer S. After 1000km, Karen loves her new Brooks Saddle. Its has solved all of her previous saddle soreness problems and she likes the springs even though they do creak a bit while riding. No different to her joints then!
8 Bicycles - Lights
On our previous bicycles we had some good halogen lights with a heavy
mains charger that we really didn't want to carry on a World tour. We
agonized for a long time over what type of lights to fit. In the end we
took some advice from the guys at Thorn again and agreed with their
obvious solution. Get to wherever your going before it gets dark, so
all you really need is some cheap LED lights just in case. So that's
exactly what we did.
We purchased Cat Eye HL-EL135 head light and TL-LD130-R rear safety
light. These both give good brightness and long battery life. We have
used them for going through tunnels, in the rain and on the odd occasion
we arrive after dark, but frankly we don't use them that much.
A problem arises when you have a loaded bicycle. With a front bar bag it
eliminates places to mount a light on your handlebar. You can mount one
on the forks, but we think this is too low down and it really needs to
be on the handlebar. This is something for Ortlieb to think about. All
they need is to add a clip on the front of their bar bag to enable a
cheap LED light to be clipped in place. In the case of the back light
we found that gear stowed on our carrier hung over the rear light
rendering it invisible. Only solution we found to this was securing our
gear so that it didn't happen, but it was a bit of a pain.
Update
We have found the Cateye lights to be very reliable and come on immediately when you need them, even if they haven't been used for ages.
9 Bicycles - Bags
We looked at a number of reviews and from what we saw the Ortlieb roller top type
seemed to be the best for durability, ease of fitting/removal and water
resistance.
We chose their Classic Roller Plus for front and back with one of their
Ultimate 5 Bar Bags and we are very happy with their performance. We
pack all of our equipment into roll top, waterproof stuff sacks and
then put them into the panniers. We have been through some real
downpours and found that this combination of good quality roll top
panniers and waterproof stuff sacks works the best, but it isn't
perfect. It is still prone to failure if you don't roll over correctly
or when you have to stop when it is raining to get stuff out of your
bag.
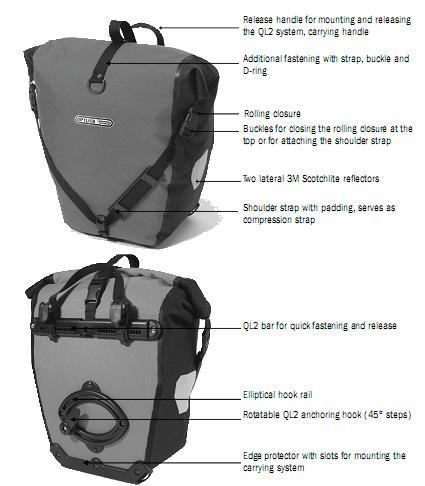
Update
Our panniers are still going well although they have a few holes that we
have patched. One big tip. The Ortlieb Panniers come supplied with
some small, fiddly plastic inserts to take account of different pannier
carrier frame sizes. They are easy to lose when they are a bit worn.
When you lift your pannier by the handle it releases the catch that
holds these clips in place and bingo, they fall out, lost forever. They
are really not very effective and they sell you four clips of two
different sizes at GBP1 each.
Instead, do yourself a favour and go to somewhere like Hoseworld
online. They sell rubber tubing by the meter in different internal and
external diameters for about GBP2/meter. Select the right ID and OD,
cut the length that you need to fit over your rack, slit it down its
length (carefully now don't want to chop off those pinkies), and slip
over the rack tubing. We also found it worthwhile to secure them in
place with a couple of small black cable ties.
This makes for a much less rattle and without the fiddly, expensive inserts from Ortlieb.
10 Bicycles - Bike Stands
It is only when you have a fully
loaded bicycle that you realise how
difficult it is to prop it against something or to stop the front wheel
swiveling around when you least want it to, usually causing you to
castrate yourself on the cross bar or crush your leg against the front
mech.
We found some prop stands to fit to the frame next to the bottom
bracket, they weren't very good as they didn't fit properly and kept
coming loose.
"Let's ask Thorn. They'll be able to recommend something", but they
wouldn't . Not only did they refuse to recommend a stand, but said that
using one would void their warranty, as with a fully loaded bicycle they
can cause the frame to twist.
We hunted around on the internet and eventually found the Click
Stand, made by a one man business in Canada. We ordered a couple and
they are excellent. Each stand is made to fit your frame size and also
comes with two ingenious elastic bands that you use to keep your brakes
applied, stopping the bicycle from moving.
Take a look at them here: Click Stand Home Page
 Click Stand
Update
We have used our Click Stands extensively over the last two years or so and we would not be without them.
They work great on most surfaces, but you have to be a little careful on
very slippery surfaces like tiles as well as on soft ground, when they
have a tendency to sink in. I made this mistake. My bicycle fell over
and broke one section of my stand.
The foot is a small rubber button, which after 1000km use has
disintegrated and on soft ground it sinks in. Tom now provides the "big
foot" which slips over the bottom end of the stand and helps to a
degree, but for soft ground I would still like to see some sort of
plate, a bit like a ski pole.
Karen's Click Stand got lost on the ocean when her bicycle was being manhandled (by someone else) aboard a small ferry.
In both of the above cases when we needed replacement parts Tom had them
shipped internationally to us with great efficiency and got us out of a
pickle. We would still highly recommend them to anyone.
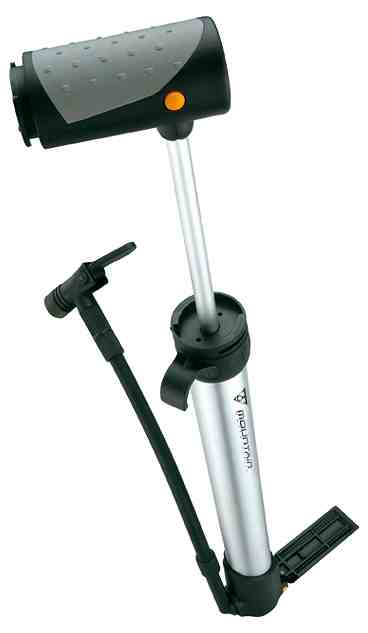
11 Bicycles - Pumps
Our pump is
a Toppeak Mountain Morph, which is very effective when compared to many of the
small pumps available.
It has a foot and a handle that turns through 90 degrees meaning that
you can use it as a mini floor standing pump. With this we can get our
tyre pressures up to their full 4 bar. I have never managed to achieve
this with any of the other mini pumps that we have used in the past.
The other good thing about the Toppeak pumps is that you can actually
buy spares for them which is lucky as we happened to lose the end of
ours.
12 Bicycles - Drinking Bottles
We didn't want to carry anything on our backs, so decided
against back mounted hydration packs. Instead we use frame mounted,
Profile Design plastic bottle carriers. For water (and other substances, wine, milk,
etc) we use Camel plastic bottles and SIG metal aluminium bottles. We
have found the former to be better as they don't impart a taste to wine
and keep milk fresher.
We also use our bottle carriers to carry the fuel bottles for our camp
stove.
13 Bicycles - Pedals
We have used Time Atac Alium Clipless MTB Pedals for probably the last
15 years and find them very reliable. We transferred them from our
previous mountain bicycles to our tourers and finally we have just had
to replace them. We were very happy to use the same, more up to date
version, (we couldn't afford to go for the top of the range Time Atac XS
Titan Carbon Pedals unfortunately).
For the budget-minded they offer the same ATAC easy entry and exit and
bio-mechanical float and rotation as top-end Time products. With ATAC,
foot retention is independent of spring tension. That means you can
crank down the binding mechanism without worry that you won't be able to
release. ± 5° of angular float paired with ± 3 mm of lateral float
means they're knee friendly, too! The same technology as the ATAC Carbon
at an economical price: durable aluminum body, reliable entry and
release in mud and all conditions and TIME's angular float for proper
bio-mechanics.
14 Bicycles - Computers
Currently we both use the Cateye Vectra, Wireless CC-VT100W bicycle computers. The only slight downside is you do have to be careful to protect them in heavy rain to prevent water ingress. This version has now been superseded by the Vectra VT 200W. We hope that Cateye have solved the water ingress problem with this model.
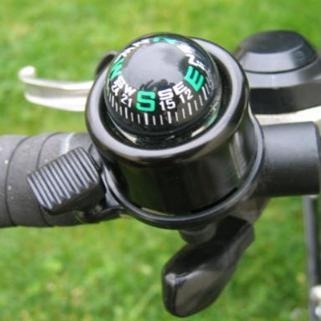
15 Bicycles - Bells and Compasses
We both use handlebar mounted bell / compass units. They are low value and of questionable quality, as the compass sometimes seems to stick. The bell is loud enough provided that you sound it repeatedly as you are approaching people.
New! Comments
Have your say about what you just read! Leave me a comment in the box below.